

Environment Center Management Guide on the Elven Platform
The Environments Center on the Elven Platform is the heart of your cloud infrastructure management. It offers an intuitive interface for creating and managing Environments, which are reflections of real-world environments on cloud providers, connected through configurations and agents. With an Environment, you can monitor and view resource insights in a centralized way, ensuring greater control and organization of your infrastructure.
However, flexibility is a priority on the Elven Platform: creating an Environment is not mandatory. If you prefer, you can monitor specific resources directly, without needing to design a full environment on the platform. This approach gives you the freedom to customize monitoring according to your needs, without losing the essence of a simple and efficient experience.
See the example:
Accessing the Environment Center
Navigate to the main menu and click on Monitoring.
In the submenu, select the Environments item.
Working with the Environment Center
In the Environments Center of the Monitoring module on the Elven Platform, you have a clear and organized view of all configured environments. Here, you can create new custom environments, manage information about connected clouds (such as AWS, Azure, and others), and edit or delete existing environments quickly and easily — all with an approach that prioritizes simplicity and efficiency.
Every detail has been designed to make the management experience more agile. With just a few clicks, you can configure new Environments to reflect your cloud environments or easily adjust existing ones. Want to create an environment? The ‘New’ button is available, redirecting you to an intuitive form. And if you need to edit or remove configurations, the pencil and trash icons ensure smooth and hassle-free navigation. This way, you have full control over your infrastructure, with the convenience only the Elven Platform can offer.
When creating a new Environment in the Environments Center of the Elven Platform, everything is designed to be intuitive and straightforward. In the Environment creation form, you can assign a unique and descriptive name to your environment (e.g., aws-demo-environment), select the cloud provider you are using, and choose the ideal region for your infrastructure (e.g., us-east-1) — all to ensure your Environment reflects exactly what you need.
Additionally, configure the instance type that best suits your computational needs (the agent is lightweight, but the choice should reflect the workload it will handle), define your VPC and Subnet, and add a Tag to help organize and identify the agent within the Cloud Provider. Once everything is ready, just click Save to finish.
Agent
In a technological world where efficiency is essential, agents play a leading role in collecting and transmitting vital data for system monitoring and maintenance. They generate information that goes beyond numbers, revealing the stories behind successful operations, failures, and recorded events. Here, we’ll explore the main types of traffic generated by ElvenWorks agents — Hits, Failures, and Logs — and how this data is essential for incident detection and resolution.
Hits reflect successful interactions between the agent and the environment, indicating that everything is working as expected. Failures, on the other hand, highlight points of concern, revealing anomalies or unsuccessful interactions. Logs are detailed records of events, operations, and critical information, bringing clarity to the investigation of any issue.
In the ElvenWorks agent logs, every detail matters. They include information such as the agent ID, the application ID and associated addon ID, and even the open incident ID. Additionally, they identify the involved organization (org_uid), record the type of interaction (resolved or alarmed), and provide incident creation and update timestamps. Other details, such as the monitoring origin (origin_entity) and the agent version, help contextualize the events and understand the sequence that led to an undesired situation.
To ensure relevance and efficiency in analysis, this information is stored for 15 days, which is enough time for both proactive and reactive actions within the environment. Thus, agents not only monitor, but also narrate, in detail, the state and health of the system — turning data into insights and contributing to safer and more stable operations.
Working with Environment and Custom Agent (OS)
The ElvenWorks agent installation is simple and adapted to major server operating systems, such as Amazon Linux, CentOS 7 and 8, and Ubuntu. After selecting the operating system, the platform will display a customized installation script to make it easier to install on your custom cloud. Make sure GitHub is already installed on the server before proceeding.
See the example:
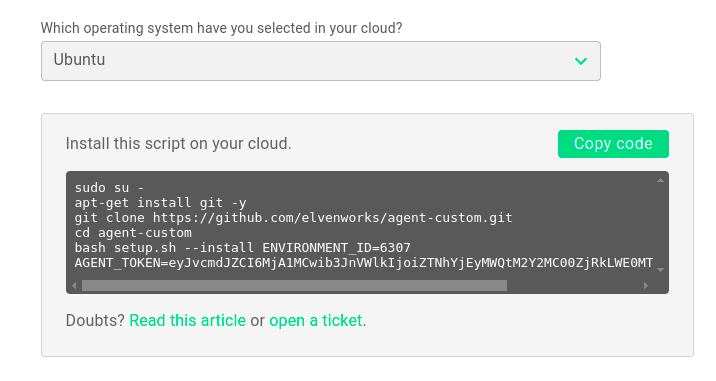
With the generated script in hand, simply copy and paste it into the terminal of the selected operating system. The process is automated and fast. Once the installation is complete, you’ll be ready to continue the monitoring configuration and take full advantage of the ElvenWorks agent’s insights.
How to Update the Custom Agent
Working with Environment and Custom Agent (Kubernetes)
When installing the ElvenWorks agent on Kubernetes, you can choose between two update options: Auto update, which keeps the agent automatically up to date at all times, or Manual update, where you control when updates are applied. This flexibility ensures the process adapts to your version management strategy.
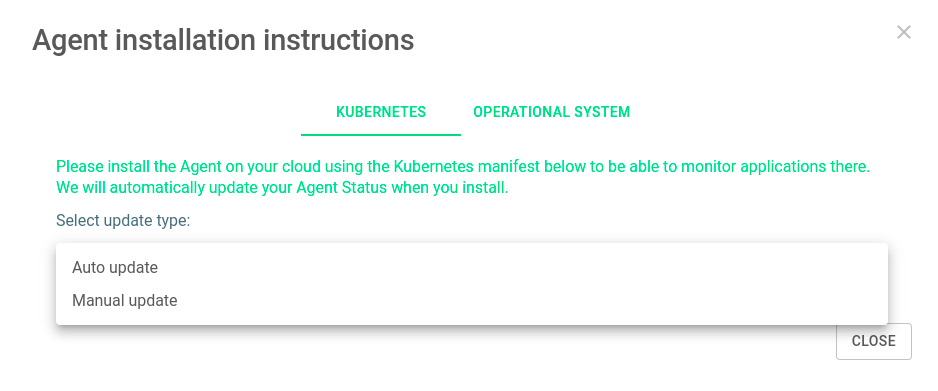
After selecting the desired option, the platform will display an automatically configured YAML. Copy the content, apply it to your Kubernetes cluster using the command kubectl apply -f, and the agent will be installed within minutes. Once the installation is complete, you can proceed with the monitoring configuration, taking full advantage of the efficiency and insights provided by the agent.
See the example:
Glossary of Technical Terms
Environment Center: A centralized area within the Elven Platform for managing and creating Environments. The Environment Center allows you to monitor, view, and manage infrastructure resources connected to cloud providers such as AWS, Azure, and others, through configurations and agents.
Environments: Environments created within the Environment Center to represent real infrastructures on cloud providers. Each Environment helps organize and monitor resources in a centralized way.
Cloud Providers: External cloud platforms that provide computing resources, such as AWS (Amazon Web Services), Azure, and others. The Environment Center on the Elven Platform can be configured to connect to these providers and monitor their resources.
Resource Monitoring: The action of collecting, viewing, and analyzing data about the connected cloud infrastructure. With the Environment Center, it’s possible to monitor resources centrally and gain valuable insights for management.
Create an Environment: The process of configuring a new Environment within the Environment Center, including selecting a name, cloud provider, region, instance type, VPC, Subnet, and other settings. When you create an Environment, you reflect the infrastructure you want to manage on the platform.
Environment Name: Field where you define a unique and descriptive name for your Environment. The name should reflect the purpose of the Environment, making it easier to identify.
Cloud Provider: The cloud service to which the Environment will be connected. Examples include AWS, Azure, and others.
Region: The geographic location of the cloud provider where the resources will be allocated. Each cloud provider offers multiple regions to choose from, such as us-east-1, eu-west-1, etc.
Instance Type: The configuration of the computing resource to be used in the Environment. The choice of instance type should consider the computational load required to efficiently support the Environment.
Agent: A software component that monitors and manages resources within an Environment. The agent is lightweight, but its configuration should match the computational demands of the Environment.
VPC (Virtual Private Cloud): A private virtual network configured within a cloud provider. In the Environment Center, you must select the VPC for the Environment, allowing resources to be isolated within the cloud.
Subnet: A subdivision of a VPC that defines an IP address range. Within the Environment Center, you select the Subnet where the Environment’s resources will be allocated.
Tag: An additional identifier used to organize and classify resources within a cloud provider. Tags help easily identify the agent and other components in the cloud.
Hits: Successful interactions between the agent and the monitored Environment, indicating that systems are functioning as expected.
Failures: Unsuccessful interactions or anomalies detected by the agent, serving as alerts for potential issues.
Logs: Detailed records of events, operations, and critical information, used to investigate and resolve incidents.
Agent ID: A unique number that identifies each agent installed in an Environment.
Application ID: A unique identifier for the application where the agent performed an interaction.
Addon ID: A unique identifier for the addon associated with the monitored application.
Incident ID: A number that identifies an incident opened by the agent during operation.
Org UID: A unique identifier for the organization where the agent is installed.
Created At: The date the incident was created by the agent.
Updated At: The date of the last update to the recorded incident.
Origin Entity: The origin of the monitoring performed by the agent, such as internal, external, multiflow, or synthetic.
Type: The classification of the interaction recorded by the agent, which can be “resolved” or “alarmed”.
Version: The version of the agent installed in the Environment.
Auto Update: An automatic update option for the agent in Kubernetes, ensuring it is always running the latest version.
Manual Update: A manual update option for the agent in Kubernetes, allowing greater control over when updates are applied.
YAML: A file format used to describe the configuration and deployment instructions for the agent in Kubernetes clusters.
kubectl apply -f: A Kubernetes command used to apply configurations described in YAML files.
Amazon Linux: A Linux-based operating system optimized for running on AWS instances.
CentOS: A widely used Linux distribution for servers, available in versions 7 and 8.
Ubuntu: A Linux-based operating system widely used in servers and development environments.
GitHub: A source code hosting platform, which must be installed on the operating system as a prerequisite for installing the agent.
Kubernetes Cluster: A group of machines running containers, managed by Kubernetes, where the agent can be installed for monitoring.
Last updated
Was this helpful?