

Configuration Guide for External Service Incident using Custom and ElasticSearch on Elven Platform
The External Service Incident Custom feature allows you to connect your API to the Elven Platform in a practical and efficient way. With this functionality, your API can send data directly to the platform using a URL specifically generated for this purpose. This data can be used to open custom incidents, enabling you to monitor events or critical situations in an automated manner. It’s a simple way to integrate your system with the platform, ensuring a fast response aligned with your needs.
Additionally, you can also send status updates, such as issue resolution. This means that as soon as an incident is handled in your API, the status can be automatically updated in the Elven Platform to Resolved. This integration reduces manual effort and improves visibility into the workflow, providing more control and peace of mind in managing your services. With this flexibility, External Service Incident Custom adapts perfectly to your environment, putting you in control of your operations.
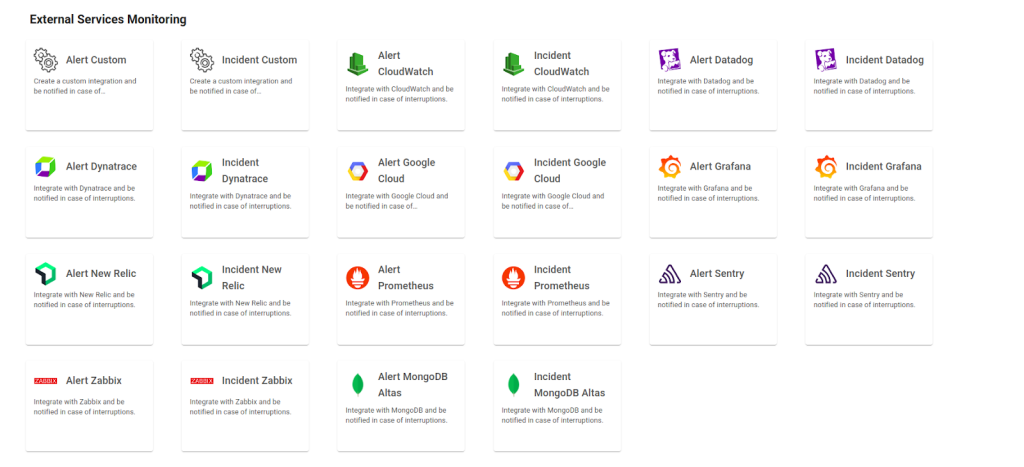
Accessing Custom External Service Incident
Navigate to the main menu and click on Services Hub.
In External Services Monitoring, select the Incident Custom item.
API Token Configuration
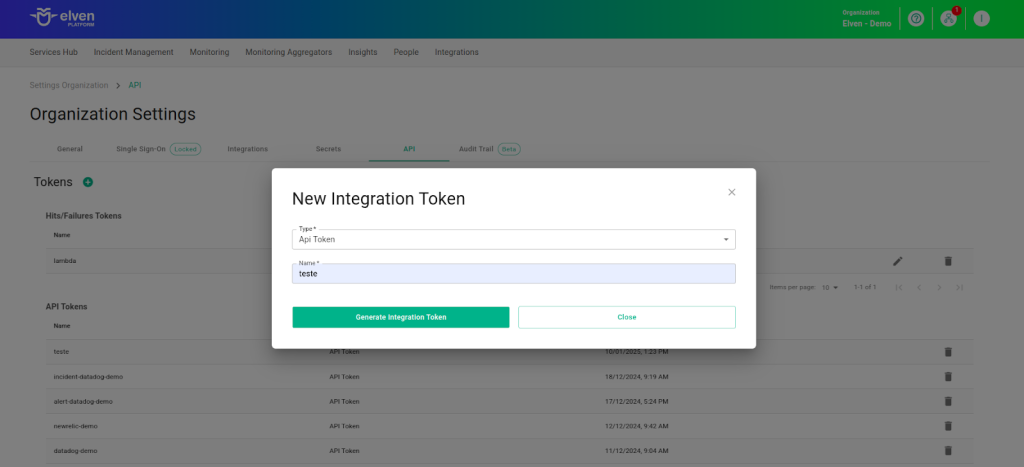
To configure the External Service Incident Custom, it is necessary to generate an API Token. This token will be included directly in the URL as part of the authentication process, serving as a key security element to ensure that only authorized users can access and interact with the external service.
In the top menu, under your user settings, click on Organization Settings.
In the API tab, click the + button to create a new API Token.
Configuration of the External Service Incident Custom
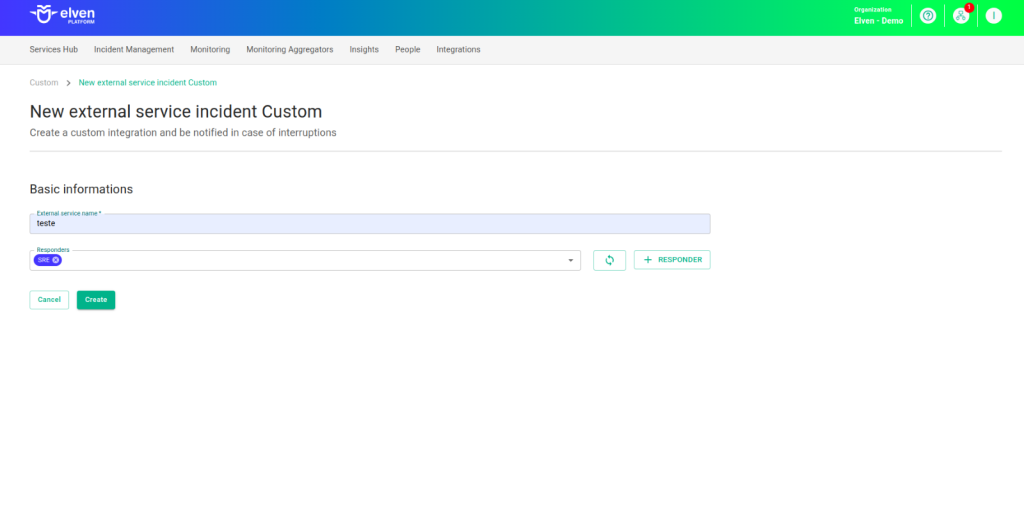
Configuring the fields in the External Service Incident Custom is an essential step to ensure that your incident notifications work efficiently and reach the right people at the right time. The first field, External Service Name, is where you should name the service being integrated. This name will appear in dashboards and reports, making it easier to quickly identify the service among others. Choose a clear and descriptive name, as it will be your reference for managing and reviewing the incident history in the future.
The Responders field is the bridge between the incident and its resolution. Here, you define who will be notified when the incident is triggered—whether specific individuals, entire teams, or even automated systems. This field is vital to ensure that incident notifications reach the right people, avoiding delays and confusion. Add relevant contacts, such as emails or team IDs, and make sure all responsible parties have the necessary information and access to act quickly. With this configuration, you turn incidents into immediate and effective actions, ensuring a smooth and reliable experience for everyone involved.
External Service Incident Custom URL
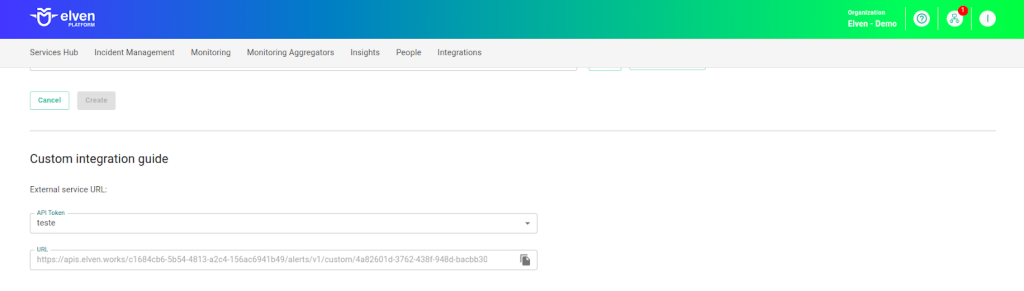
When configuring an External Service Incident Custom, one of the most important steps is selecting the API Token you previously generated. This key acts as a unique credential that securely connects your system to the incident notification service. Think of it as a “master key” that enables authentication and communication between platforms. Make sure to choose the correct API Token and keep it protected, as it is essential for the service to function and to ensure the integrity of the integration.
After selecting the API Token, you will gain access to the External Service Incident Custom URL, which is automatically generated. This URL will be used to send incident notifications to the Elven Platform. It’s important to store this URL carefully and share it only with authorized people or systems. With this configuration, you ensure that incidents are delivered efficiently, creating a reliable experience for the teams involved and reducing potential interruptions or failures in the communication flow.
Additionally, when configuring an incident in External Service Incident Custom, it’s important to correctly fill in some key fields to ensure the system works effectively. The action field must be filled with either “alarmed” (to open an incident) or “resolved” (to indicate the incident has been resolved). The external_aggregate_key field acts as a unique identifier for the incident and is required for both actions, as it links the opening and resolution information. Moreover, the severity field defines the incident’s criticality and should be filled with one of the available options: critical, high, moderate, low, or informational. In the tags field, you can add information that helps identify the origin of the incident. This facilitates categorization and tracking, making analysis faster and more efficient. Filling in these fields correctly helps ensure clear and effective communication between systems, allowing teams to prioritize responses based on the incident’s severity and status.

Here is an example of a CURL command for the custom integration:
url: API_URL generated when creating the External Service.
title: Defines the title of the incident that will appear in the Elven Platform.
description: Description of the incident, which will be displayed as the “cause” in the Elven Platform.
external_aggregate_key: Identifier used to “open” and “close” the incident. It must be the same for both actions.
action: Executed action, such as “alarmed” (to open) or “resolved” (to close) the incident.
severity: Defines the severity of the incident (informational, low, moderate, high, critical).
tags: Use the tags field to identify the origin of the incident and facilitate its analysis.
Configuring Webhooks in Elasticsearch
Setting up a Webhook in ElasticSearch to integrate it with the Elven Platform is a simple task that can be completed quickly with a few steps. The process involves creating a connector in Elastic Cloud and configuring its properties to enable communication with the external integration. Let’s break down how to do this clearly and practically.
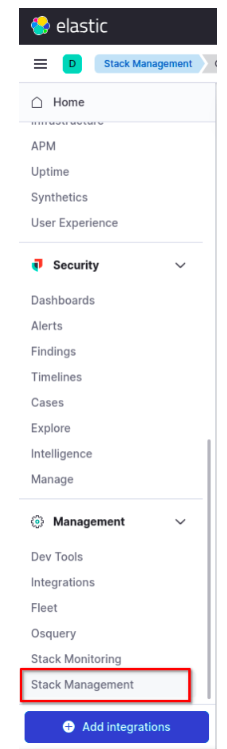
First, access Elastic Cloud and go to the Stack Management section. Within it, locate the Alerts and Insights area and click on Connectors. This is where we will configure the integration that will connect ElasticSearch to the Elven Platform.
In the next step, click on Create Connector and choose the Webhook option. Now it’s time to configure the connector details. Give the connector a name—something that clearly identifies its purpose, such as “Elven Platform Webhook”. Then, set the method to POST and enter the URL generated during the creation of the external integration in the URL field.
For this configuration, authentication is not required, so you can uncheck that option. However, remember to add an HTTP header to ensure the integration works correctly. To do this, select the ADD HTTP HEADER option and fill in the fields with the following values:
Key: User-Agent
Value: 1PcustomAuth/1.0

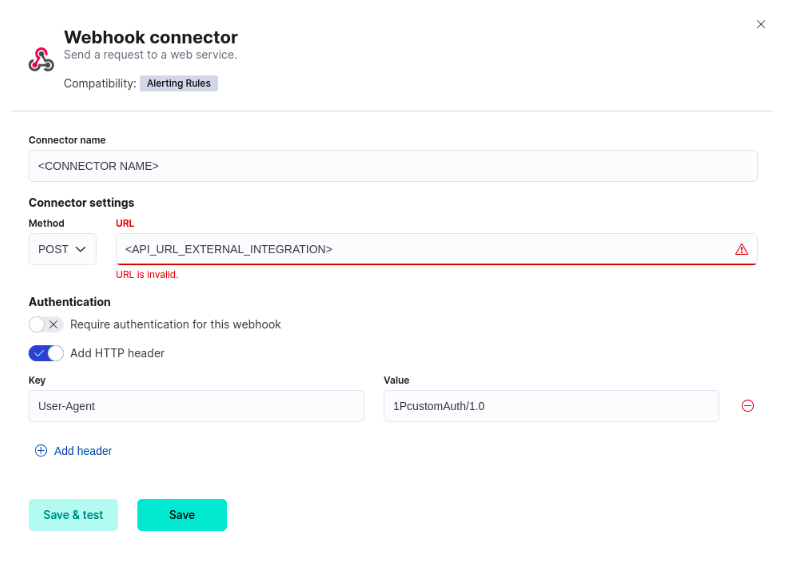
With these adjustments in place, click on Save & Test to check if the connector has been configured correctly. On the next screen, it’s time to customize the payload that will be sent to the Elven Platform. This payload defines the information that will appear as an alert on the platform.
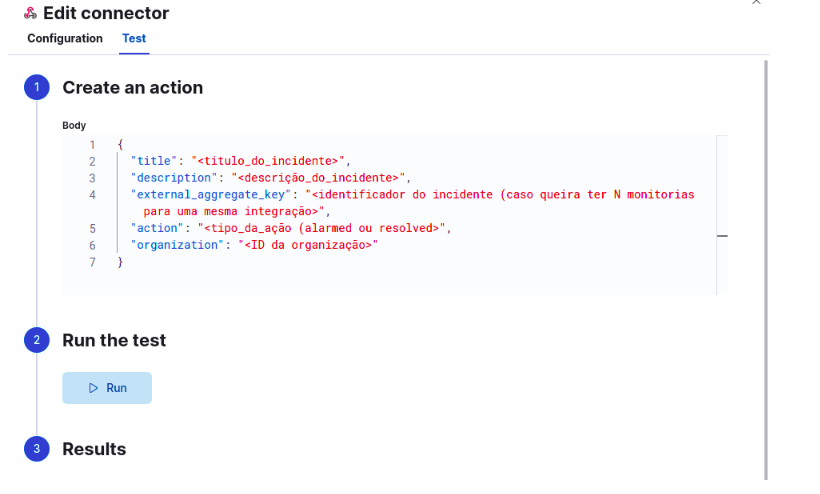
Fill in the fields as follows:
title: A title that describes the incident (for example, “Connection Error in Application X”).
description: An explanatory text about the incident, helping to detail the issue.
external_aggregate_key: A unique identifier for the incident, useful for grouping related monitoring events.
action: The type of action, such as Alarmed (for alerts) or Resolved (for resolution).
organization: The Elven Platform organization ID to which the incident will be associated (must be requested from the Elven Platform Support team).
After filling in the payload body, click on Run to perform a test. If everything is configured correctly, you will receive an incident notification in the Elven Platform.
This process is essential to ensure that ElasticSearch alerts are efficiently integrated with the Elven Platform, enabling centralized and agile incident management.
Once configured, the service will appear in the External Services Monitoring Center, categorized by status, making it easier to monitor incidents, with priority given to those in an alarm state.
Additional security and performance settings
IP Whitelist: API communication can be configured to allow only authorized IP addresses. To enable or modify this setting, contact Elven Platform support.
Rate Limiting: The default rate limit is 5 minutes, but it can be adjusted as needed. For changes, contact Elven Platform support.
These settings ensure greater security and control over the data traffic between integrated systems.
Glossary of Technical Terms
API Token: A unique credential used to authenticate and authorize communication between your API and the Elven Platform. Included in the URL generated for authentication and data submission to the external service.
External Service Incident Custom: A feature of the Elven Platform that allows integration with external APIs to send incident notifications and status updates. Automates the monitoring of critical events and enables efficient incident management.
External Service Name: The name assigned to the integrated service. Identifies the service in dashboards and reports on the platform.
Responders: Individuals, teams, or systems responsible for responding to triggered incidents. Automatically notified to resolve issues related to the incident.
External Service Incident Custom URL: Automatically generated address for sending incident notifications to the integrated service. Connects your API to the Elven Platform’s incident system.
Organization Settings: Menu in the Elven Platform where API tokens can be generated and managed. Used to create new tokens for authenticating external services.
title: The incident title that will be displayed in the Elven Platform. Provides a clear and quick view of the nature of the incident.
description: Details of the incident, shown in the “cause” field in the Elven Platform. Provides additional context for analysis and problem resolution.
external_aggregate_key: A unique identifier used to associate actions like “open” and “close” incidents. Must be the same in both actions to maintain consistency in incident management.
action: The action performed on the incident, such as “alarmed” (open) or “resolved” (close). Indicates the current status of the incident in the system.
severity: The incident severity level, which can be informational, low, moderate, high, or critical. Helps prioritize the response based on the severity.
ElasticSearch: A distributed search and analytics engine based on the Apache Lucene library. Widely used to store, search, and analyze large volumes of data in near real-time. It is the core tool within the Elastic Stack, enabling fast and efficient queries on structured and unstructured data.
Elastic Cloud: A cloud-based service that provides access to ElasticSearch and other Elastic Stack tools for data management and analysis.
Stack Management: A section in Elastic Cloud used to manage stack configurations and integrations, such as connectors, alert rules, and monitoring.
Alerts and Insights: A specific area within Stack Management dedicated to configuring alerts, connectors, and data-based insights.
Connectors: Tools that allow ElasticSearch to integrate with external services or platforms to automate notifications and actions based on alerts.
Webhook: A method of communication between systems that allows sending information (payloads) from one service to another via HTTP requests.
Create Connector: An option in Elastic Cloud that allows the creation of new connectors for integration with external services.
Method (POST): One of the HTTP methods used to send data to a server, typically to create or update resources in external systems.
URL: The API address generated by the external integration, used to send ElasticSearch data to the Elven Platform.
Authentication: A mechanism to verify the identity of a user or system. In this case, it is not required for the configuration.
HTTP Header: Additional information sent along with an HTTP request to configure or customize communication between systems.
Key (User-Agent): An HTTP header used to identify the client making the request. In this case, it is set as 1PcustomAuth/1.0.
Save & Test: Option to save the connector settings and perform a test, verifying whether the integration is working correctly.
Payload: A set of data sent in an HTTP request to communicate specific information between systems. Here, it defines the incident details.
Title: A field in the payload that defines the incident title, displayed in the Elven Platform.
Description: A field in the payload that provides a detailed description of the event that triggered the incident notification, helping with context.
External Aggregate Key: A unique identifier for the incident notification, used to group related monitoring events in the Elven Platform.
Action: A field that specifies the type of action related to the incident, such as Alarmed (when detected) or Resolved (when resolved).
Organization: The ID that identifies the organization in the Elven Platform, ensuring that data is associated with the correct entity. Must be requested from the Elven Platform Support Team.
Last updated
Was this helpful?