

Team Management Guide on the Elven Platform
This guide presents the main features of the Teams Center on the Elven Platform, such as creating a new team, configuring notifications, managing, scaling team members, and checking on-call schedules. This way, you can better organize and optimize communication between teams and their members. The Teams Center on the Elven Platform ensures your team stays connected and organized, increasing productivity and reducing communication failures.
Navigating the Teams Center
To navigate the Teams Center, start by accessing the top menu and clicking on People. Then, in the submenu, select Teams to view the list of all existing teams. On this screen, each team is displayed with essential information such as Name (team name), Members (number of members), and Actions, where you can perform actions like deleting a team. To make it easier to find a specific group, use the search bar, ensuring faster and more intuitive navigation.
By selecting a team from the list, you will be directed to a full page designed to facilitate team management. In the Members section, you can view, add, remove, and manage member permissions, ensuring each member has the appropriate level of access. The On-call tab allows you to monitor and organize who is on duty, making the distribution of responsibilities more efficient. In Integrations for Notifications, you can configure and manage all notification integrations, ensuring alerts are delivered correctly. Finally, in Notification Rules, you can define custom rules so that notifications are sent through the most appropriate channel for each situation.
Creating a New Team
Click the + Team button in the upper right corner.
Fill in with Name: team name.
Managing a Team
When accessing a specific team, as mentioned earlier, you will find four main sections:
Members
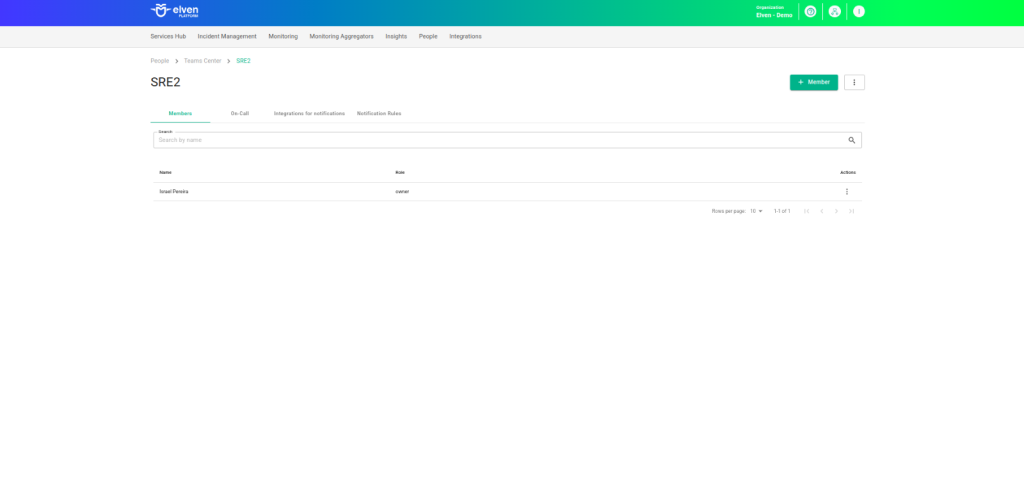
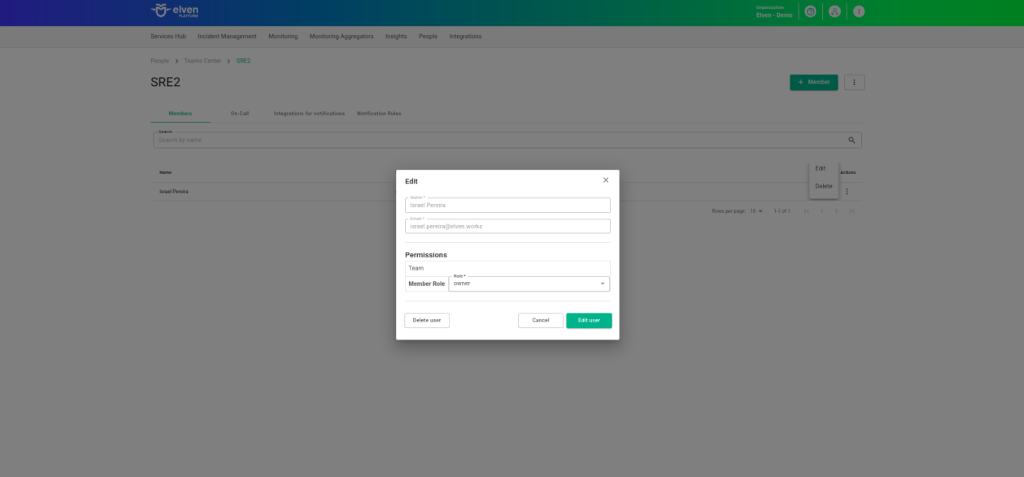
In the Members section, you will find the complete list of team members, with information such as name and role within the team. Here, you can add new members or edit the roles of existing ones, ensuring each person has the appropriate access and responsibilities within the team. To maintain organization and security, each user can assume one of three main roles: Member, Admin, or Owner, each with specific permissions to facilitate collaboration.
The Member is the default role, ideal for those who only need to collaborate and receive notifications, without access to advanced team management settings. The Admin has a more active role in management, being able to add or remove members, change roles, configure notifications, and integrate services like Slack and Webhooks. They assist the Owner in managing the team. The Owner, in turn, has full control over the team, being able to manage notifications, schedules, on-call rotations, add and remove members, and even delete the team.
This structure ensures that each member has access only to the features necessary for their responsibilities, promoting a secure, organized, and productive environment. This way, the team can operate efficiently, ensuring that strategic decisions are in the right hands and that everyone can focus on what truly matters.
On-Call
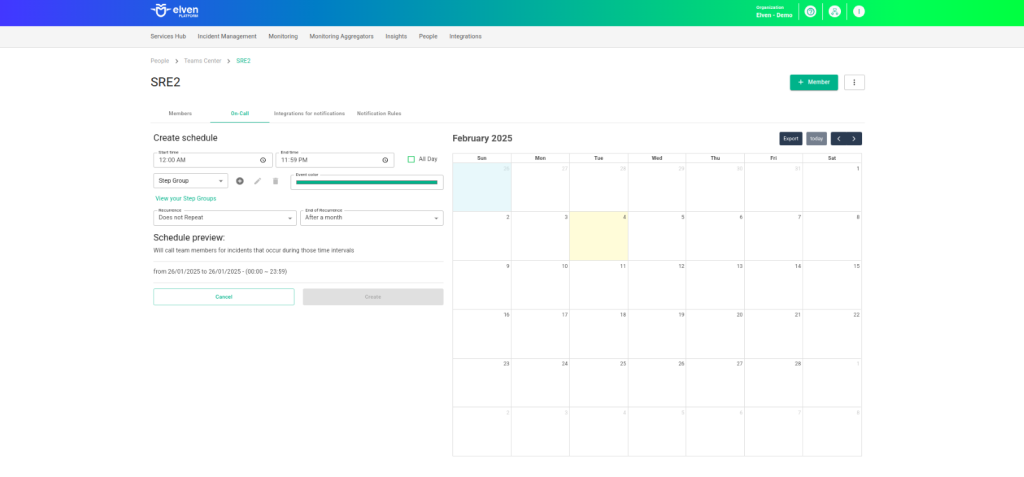
The On-call feature of the Elven Platform revolutionizes the management of on-call duties and responsibilities, making the distribution of alerts and calls more practical and efficient. With this solution, it is possible to organize schedules in an automated way, ensuring that each team member knows exactly when and how to act during incidents or on-call periods. This automation reduces the need for manual intervention, avoiding confusion and delays in response.
In the Elven Platform, you can customize on-call hours and define the notification order of team members, creating a structured and efficient rotation. With the On-call feature, it is possible to configure schedules to distribute responsibilities fairly, adjust the notification sequence according to team priority, and manage on-call duties in a centralized manner. This way, the platform ensures that alerts always reach the right person at the right time.
With this approach, the On-call feature of the Elven Platform not only improves internal communication but also minimizes failures and ensures continuous coverage. Whether in critical incidents or daily support, your team will always be prepared to respond quickly, ensuring a more agile and effective workflow.
Important: If a user has registered the mobile app on more than one device and has enabled more than one of them to receive notifications in their profile, when creating a schedule (step group), the mobile option will still only be displayed once. However, when the alert/incident is sent, the notification will go to all enabled devices.
Integragions for Notifications
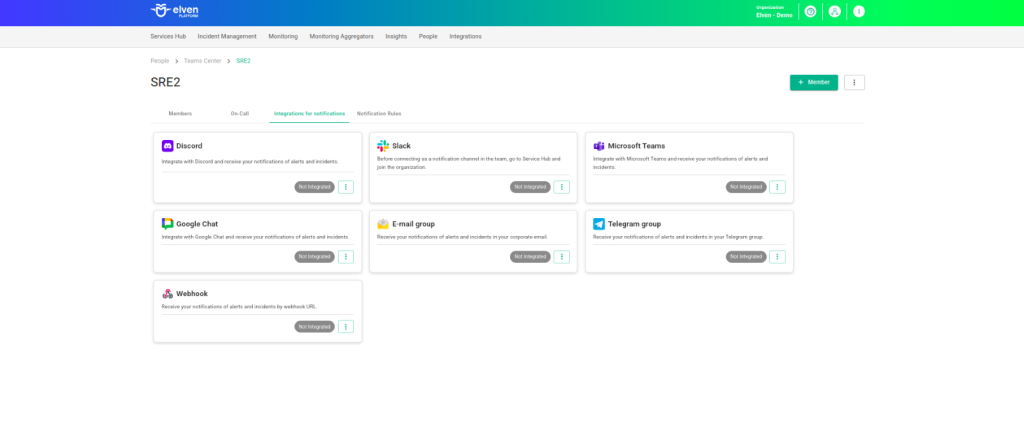
In the Integrations for Notifications section, you can configure and manage all notification integrations. Among the available options, you can enter an Email group to send notifications to a collective email address. If using Telegram, simply provide the group ID so alerts are correctly directed. In Slack, you need to specify the workspace and channel, while in Microsoft Teams, the process involves adding the Webhook URL, following the integration instructions. For Google Chat and Discord, just enter the corresponding Webhook URL for the desired channel.
If your team uses custom services, the Webhook option allows you to configure a specific URL for sending external notifications. After configuration, make sure all integrations, such as Slack and Webhooks, are active and functioning to avoid communication failures.
Notification Rules
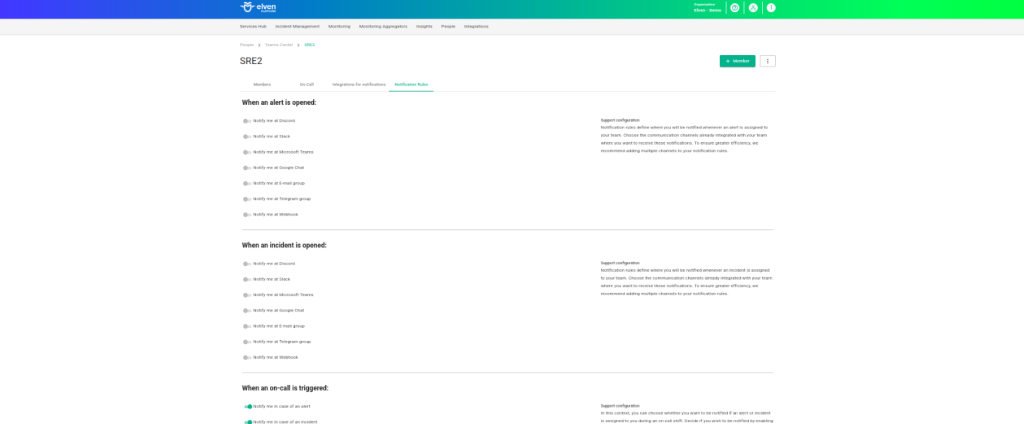
In the Notification Rules section, you can define which channels will be activated to send notifications whenever an alert, incident, or on-call event is triggered. These rules are configured based on the channels enabled in Integrations for Notifications, ensuring your team receives information through the most appropriate means.
This configuration is organized into three main sections:
When an alert is opened, which determines how alerts are notified;
When an incident is opened, which controls notifications when an incident is registered; and
When an on-call is triggered, which defines the active channels when a team member is called during an on-call.
This flexibility allows you to customize notifications so they reach the right recipients at the right time.
It’s important to note that notification rules configured in the user profile take priority over those defined for the team, providing a higher level of personalization. This way, each member can adjust their individual preferences without compromising the team’s overall communication. With this approach, the Teams Center ensures no one misses critical information, keeping everyone connected and ready to act quickly.
Usage Tips
Organization is essential: name the teams intuitively, reflecting their areas or responsibilities.
Notification Testing: validate the configured channels before using them in real situations.
Regular Maintenance: update members and roles according to changes in the team.
Example of Setting Up a Telegram Group in the Teams Center
Let's set up a Telegram group in the Elven Platform quickly and easily! First, open Telegram and, in the search bar, type GlorfindelBot. When you find the bot named 1P, select it and click Start to begin the interaction. Now, we need to create a group to receive the notifications. In the bottom right corner, click the pencil icon, choose the New Group option, and in the member list, search for GlorfindelBot to add it as a member of the group.
After adding the bot, set a name for the group and click Next to finish the creation. With the group ready, send the command /mychatid in the group chat so the bot provides the group ID. Copy this ID and go to the Elven Platform. In the Telegram field under the Teams Center settings, Telegram group, paste the group ID and click Save to save the settings.
Now everything is ready! Whenever there is an alert or incident, you will receive a message directly in the configured Telegram group.
Example of Setting Up a Channel on Discord in the Teams Center
To integrate notifications from the Elven Platform into your Discord server, the process is simple and straightforward. First, access Discord via browser or app and go to the incoming webhook connector. Click on Add Server or use an existing one, then select the channel where you want to receive notifications from the platform. This choice is important to keep your team informed in the right channels without cluttering other conversations.
After that, go to the Server Settings, click on the Integrations tab, and select Create Webhook. Give your webhook a friendly name, something that clearly identifies the source of the messages, like “Elven Alerts.” Choose the channel where these messages will be sent and, finally, copy the generated URL. This URL is the secret address that allows Elven to send notifications directly to your Discord—just paste it where the integration requests it. And that’s it: your communication with the platform will be automated and smooth, promoting a more integrated and efficient experience for you and your team.
Glossary of Technical Terms
People: Top menu option where users can access the list of teams and manage groups within the Elven Platform. Teams Center: Area of the Elven Platform dedicated to managing teams, members, and their interactions. Team: Group of people with a shared purpose or responsibility on the platform. Actions: Available operations that can be performed on a team, such as deleting or editing information. Member: Default role assigned to a user when joining a team. Can collaborate and receive notifications, but does not have administrative permissions. Admin: User with a more active role in management, able to add or remove members, change roles, configure notifications, and integrate services like Slack and Webhooks. Owner: User with full control over the team, able to manage notifications, schedules, on-call rotations, add and remove members, and even delete the team. Integrations for Notifications: Section within the Teams Center where you can configure integrations with different notification channels, such as Email group, Telegram, Slack, Microsoft Teams, Google Chat, Discord, and Webhooks. Webhook: Integration that allows sending customized notifications to external services through configured URLs. Notification Rules: Section responsible for defining notification rules for alerts, incidents, and on-call events. Allows customization of communication channels according to the team’s needs. On-call: Feature that manages on-call rotations, ensuring responsibilities are efficiently distributed among team members.
Last updated
Was this helpful?